

Anyone can create a fully functional WordPress website fast. Thanks to Docker, there’s no need to install LAMP stack on your computer. To demonstrate how easy it is to raise LAMP stack using Docker, we will create new WordPress website. In fact, rokpoto.com itself was created using Docker. In addition, Docker simplifies local development and testing. Keep reading to find out how 🙂
Quick video demo is below:.
Prerequisites
Install on your development station:
- docker
- docker-compose
- git
- php
- composer
The tutorial assumes familiarity with:
- WordPress
- LAMP stack
- Basic Git, Docker and Docker-compose commands.
- Bedrock stack
Motivation
Why Docker?
Docker removes the need to install each LAMP stack component on your development environment. Hence, just use docker images of each LAMP component and configure them.
Why Docker-Compose?
Docker-compose is a great tool for declaring and running multi-container Docker applications e.g. LAMP stack. So, we’ll use it to bring up LAMP stack components. In addition, the stack can be tracked using source-control (Git).
Why Bedrock?
Bedrock is a modern WordPress stack. In short, it allows to manage WordPress, its plugins and themes using Composer. In addition, Bedrock conforms to Twelve-Factor App methodology. Hence, if you are into the modern world of micro-services and automation – Bedrock is for you. Also, you can find great tutorial about Bedrock here.
Install WordPress in dockerized LAMP stack step by step
- Clone basic project from my github. Note the structure of
wwwfolder which is typical for Bedrock WordPress site.
├── docker
...
└── www
    └── sample
        ├── composer.json
        ├── config
        │   ├── application.php
        │   └── environments
        │       ├── development.php
        │       ├── production.php
        │       └── staging.php
        ├── phpcs.xml
        ├── public_html
        │   ├── app
        │   │   ├── mu-plugins
        │   │   ├── themes
        │   │   └── uploads
        │   ├── index.php
        │   ├── php.ini
        │   ├── wp
        │   └── wp-config.php
        └── wp-cli.yml
Architecture
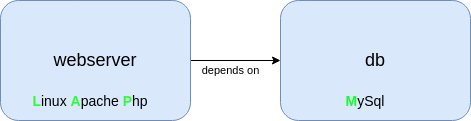
Our docker-compose.yml file contains 3 services:
- webserver – apache with installed php. Of course, website source code is mapped to some path inside the container.
- db – MySql
- phpmyadmin – web tool for managing MySql
Configurations
We are very close to bringing up the WordPress site to life.
However, first let’s configure a few things. Most of the configurations will focus on 2 files:
- www/sample/.env – contains environment variables used by Bedrock
- .env – contains environment variables used in docker-compose.yml
There are 2 sample environment files. Let’s create our .env files from them:
/tmp/lamp-wordpress-bedrock$ cp sample.env .env
/tmp/lamp-wordpress-bedrock$ cp www/sample/.env.example www/sample/.env
Configure MySQL
MySQL component is based on mysql:5.7 official Docker image.
Note db service inside compose file and its desired state.
  db:
    build:
      context: "./docker/${DATABASE}"
    container_name: '${COMPOSE_PROJECT_NAME}-db'
    restart: 'always'
    ports:
      - "127.0.0.1:${HOST_MACHINE_MYSQL_PORT}:3306"
    volumes:
      - ${MYSQL_DATA_DIR-./data/mysql}:/var/lib/mysql
      - ${MYSQL_LOG_DIR-./logs/mysql}:/var/log/mysql
      - ./config/mysql:/etc/mysql/conf.d
    environment:
      MYSQL_ROOT_PASSWORD: ${MYSQL_ROOT_PASSWORD}
      MYSQL_DATABASE: ${MYSQL_DATABASE}
      MYSQL_USER: ${MYSQL_USER}
MYSQL_PASSWORD: ${MYSQL_PASSWORD}- .env configurations
- MySQL will listen on HOST_MACHINE_MYSQL_PORT on docker host. It’s mapped to default MySQL port 3306 inside the container. HOST_MACHINE_MYSQL_PORT has to be vacant on docker host.
- MySQL data will reside in MYSQL_DATA_DIR.
- WordPress database will reside in MYSQL_DATABASE whose owner is identified by MYSQL_USER, MYSQL_PASSWORD.
- MySQL configuration file config/mysql/overrides.cnf is made available to the container through docker volume.
Configure WordPress
- www/sample/.env configurations. WordPress needs to know MySQL details as well. For that reason we’ll specify below DB configurations:
- DB_HOST=db (name of compose service )
- DB_NAME=sample
- DB_USER=sample
- DB_PASSWORD=sample
Note that db name, user and password have to be the same as in .env above.
Configure Apache
Apache component is based on Apache official docker image php:7.3-apache-stretch. It has php, php extensions and Apache modules installed in it. In addition, wp-cli is installed in webserver.
Note its desired state below:
  webserver:
    build:
      context: ./docker/${PHPVERSION}
    container_name: '${COMPOSE_PROJECT_NAME}-webserver'
    restart: 'always'
    ports:
      - "${HOST_MACHINE_UNSECURE_HOST_PORT}:80"
      - "${HOST_MACHINE_SECURE_HOST_PORT}:443"
    links:
      - db
    volumes:
      - ${DOCUMENT_ROOT-./www}:/var/www
      - ${PHP_INI-./config/php/php.ini}:/usr/local/etc/php/php.ini
      - ${VHOSTS_DIR-./config/vhosts}:/etc/apache2/sites-enabled
      - ${LOG_DIR-./logs/apache2}:/var/log/apache2
    environment:
      APACHE_DOCUMENT_ROOT: ${APACHE_DOCUMENT_ROOT-/var/www/sample/public_html}
      PMA_PORT: ${HOST_MACHINE_PMA_PORT}
      MYSQL_ROOT_PASSWORD: ${MYSQL_ROOT_PASSWORD}
      DB_HOSTNAME: db
PROJECT_NAME: ${COMPOSE_PROJECT_NAME}- .env configurations:
- Apache will listen on HOST_MACHINE_UNSECURE_HOST_PORT. Also, you can use HOST_MACHINE_SECURE_HOST_PORT. Of course, it has to be vacant on Docker host.
- DOCUMENT_ROOT is where your WordPress installation will reside inside webserver service container.
- MySQL hostname and root password is specified in environment block because Apache will have to create a WordPress database in MySQL.
- VHOSTS_DIR/config/vhosts contains Apache virtual hosts configuration file default.conf. Note its contents below:
<VirtualHost *:80>
    ServerName  http://localhost:4090
    DocumentRoot ${APACHE_DOCUMENT_ROOT}
    <Directory ${APACHE_DOCUMENT_ROOT}>
		AllowOverride all
	</Directory>
    CustomLog /var/log/apache2/local-access.log "combined"
    ErrorLog /var/log/apache2/local-error.log
</VirtualHost>
APACHE_DOCUMENT_ROOT is the path to your WordPress website public_html folder inside the container. Thus, Apache will serve the website from there. APACHE_DOCUMENT_ROOT is also specified in Apache environment.
Important: note that port 4090 is referenced in:
- Apache configuration file
- HOST_MACHINE_UNSECURE_HOST_PORT in .env.
- WP_HOME in www/sample/.env.
If you change this port, make sure to change it in all above places.
Install and run WordPress
- Run below command to install WordPress 5.7.2 in www/sample/public_html/wp
/tmp/lamp-wordpress-bedrock$ cd www/sample/
/tmp/lamp-wordpress-bedrock/www/sample$ composer update
It installs other Bedrock required PHP packages, specified in require field of www/sample/composer.json:
 "require": {
    "php": ">=7.0",
    "composer/installers": "^1.4",
    "vlucas/phpdotenv": "3.3.2",
    "oscarotero/env": "^1.1.0",
    "roots/wordpress": "5.7.2",
    "roots/wp-config": "1.0.0",
    "roots/wp-password-bcrypt": "1.0.0"
},- Bring up WordPress compose environment:
/tmp/lamp-wordpress-bedrock/$ docker-compose up -dDocker-compose will build the necessary Docker images and start all LAMP components.
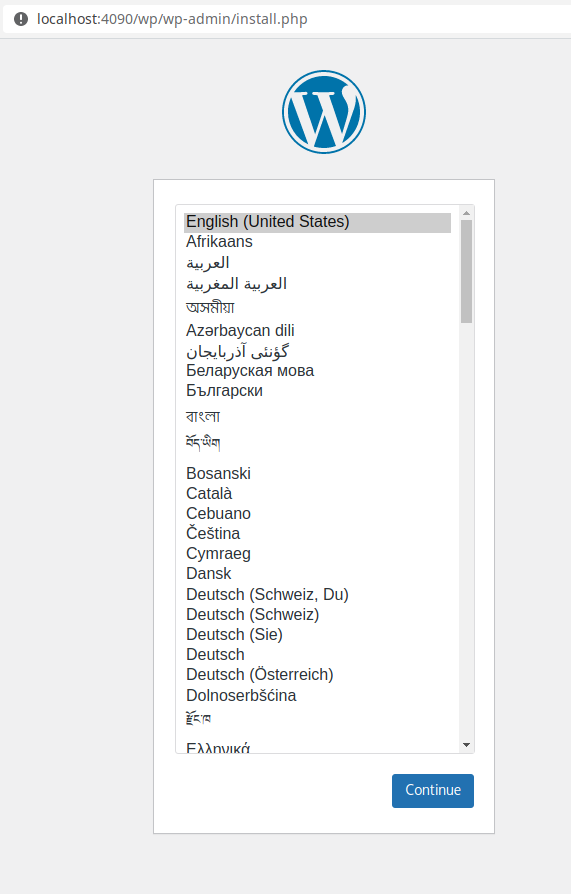
Navigate to http://localhost:4090 in a browser and you should see WordPress configuration screen. 🙂
Thanks for your attention if you read till this point. Of course, feel free to comment and ask questions.
What’s next
Stay tuned for below useful related stuff which will be published soon 🙂
- automated dockerized WordPress website testing using Selenium (in docker, of course:) )
- adding Google Analytics to your WordPress website without a plugin
- pushing your website code to Azure DevOps and creating CI/CD pipelines.
- remote debugging containerized Python code using VSCode
Bonus
- Wondering where to host your WordPress site? Siteground is highly recommended because of its great support and caching solution. ( I use it myself 🙂 )