
What are Kubernetes volumes, their types and concepts behind them? We’ll cover all of that below. In addition, we’ll see practical demo of using Kubernetes volumes.
Introduction
Kubernetes volumes answer below questions along with many others.
- what happens to the data written by containers in a pod after the pod stops?
- how do containers running in a pod share data?
You may already know that Kubernetes uses volumes to store data of apps. You may also be familiar with docker volumes and how they work. Are there more storage options in Kubernetes world? What kinds of volumes exist? Keep reading to find out. As always, we’ll see a practical demo as well.
Kubernetes volumes explained
So we know that Kubernetes volumes store data of apps running in container pods. Examples of data could be app logs or files the app shares with other apps. App example could be containerized database. But what Kubernetes volume actually is? On the most basic level it’s a directory with data to which container running in a pod has access to.
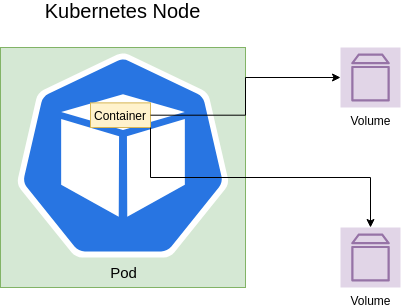
What happens to data if a container stops or crashes? Usually, the data is lost unless it’s mapped using volumes to the host. Kubernetes solves this problem using volumes as well. There a lot volume types. And of course, volumes specific behavior may vary. Though, if we select the most common type for sharing data between containers in a pod – emptyDir, the data will survive. It’s true even if there’s only one container in a pod and it crashes. Of course, the data is safe only as long as the pod is alive.
What if we want data persistence beyond pod life-cycle? For that Kubernetes offers Persistent volume. What is it? It’s Kubernetes cluster storage unit. Its data is safe even if the pod using it ceases to exist.
Volumes Types
There are a lot of Kubernetes volume types. The most common ones are:
hostPath– mountsKubernetesnode path to containers in a podemptyDir– shares data between containers in a pod.nfs– shares data with a pod using network storage.persistentVolumeClaim– mounts aPersistentVolumeinto a pod.
I would cover below important volume types in future posts.
configMapsecret
It’s time to see Kubernetes volumes demo.
Kubernetes volumes demo
Demo Prerequisites
Install on your machine:
minikubekubectlscaffold
Mount host data to containers in a pod
Imagine a situation when a pod or more precisely its containers need to access host data. For example, we might need to run docker client inside docker container which runs in a pod. To that end we need to mount docker socket from the host to the container. We’ll use hostPath volume type for that.
Let’s see a real-world example when Jenkins needs to run docker client commands inside docker agents. You wonder why it might be needed? For instance, for pushing an image to a registry in CI/CD pipeline. We have seen such example when we explored CI/CD using Jenkins and Docker.
Mount Persistent Volume to a pod
We’ll see also how Jenkins data is persisted across Jenkins restarts thanks to PersistentVolumeClaim. It mounts PersistentVolume to Jenkins pod.
Kubernetes volumes in action step by step
- clone
docker_in_jenkinsrepository from my GitHub andcdinto it. - start
minikubecluster and initializeskaffold
minikube start --profile custom
skaffold config set --global local-cluster true
# run below in any new terminal to cause kubectl commands be configured to run against minikube cluster
eval $(minikube -p custom docker-env)- run
scaffold runto build and apply the manifests tominikube - it will take some time to build the image in
minikubevirtual machine and deploy the manifests tominikubecluster - make sure
jenkinsis running usingkubectl get all | grep jenkins. You can see thatJenkinsis deployed. ItsDeploymentis usingReplicaSetto manage the pods. And it’s exposed asService. You may find Kubernetes Services, Kubernetes Deployments, ReplicaSets and Kubernetes Pods demos useful. - let’s now access
Jenkins. To that end, we’ll use port forwarding:
kubectl port-forward svc/jenkins 8080:8080- navigate to https://localhost:8080 and you should see
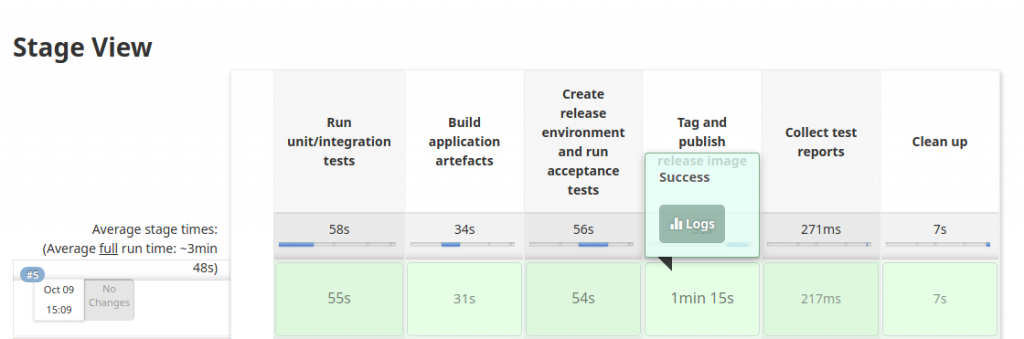
JenkinsUI. Nice!Jenkinsis running and configured for us. Next, login asadminusingadminpassword. - now, create new Jenkins job which runs CI/CD flow that uses docker commands. I’ll follow Running CI/CD pipeline in Jenkins to create
todobackendjob. Now run the job. After a while the full CI/CD flow finishes.
Kubernetes hostPath volume usage
- so we have Jenkins running in docker container. And docker commands run inside Jenkins container when the job runs. In order to succeed, docker client in Jenkins container needed access to docker socket from the docker host. How did it work? Right. Thanks to
Kubernetesvolume. More specifically,docker-socketvolume of typehostPath. Note that in our case, docker host isminikubeVM.
        - name: docker-socket
          hostPath:
            path: /var/run/docker.sock
type: Socket- the volume is mounted at
/var/run/docker.sockinside Jenkins container.
            - mountPath: /var/run/docker.sock
name: docker-socket- do you still have doubts? Enter
Jenkinscontainer and run sample docker command inside. Run below commands in a new terminal in order to keep port forwarding running in the first terminal.
$ kubectl get pod | grep jenkins
jenkins-55b4bddcc8-kk7th      1/1     Running            0          24m
$ kubectl exec -it jenkins-55b4bddcc8-kk7th  bash

# inside jenkins container
root@jenkins-55b4bddcc8-kk7th:/# docker ps | grep jenkins
677ccc4d1f0d        6460b0620ef3             "/usr/local/bin/entr…"   25 minutes ago      Up 25 minutes                           k8s_jenkins_jenkins-55b4bddcc8-kk7th_default_4de858bf-5eb8-4f5c-b6ae-50ee98270de0_0
Kubernetes PersistentVolumeClaim usage
- what about
Jenkinsdata like job we created, installed plugins, etc.. Will we lose it when we restartJenkins? We’d rather not 🙂 Let’s see what happens after we restartJenkinsdeployment.
$ kubectl get deployments.apps | grep jenkins
jenkins      1/1     1            1           17h

$ kubectl rollout restart deployment jenkins
deployment.apps/jenkins restarted- login to
JenkinsUI and magicallytodojob we created is still there. - of course, data is not lost even after restart. How did we achieve that? We used
Kubernetesvolume of typepersistentVolumeClaimfor that.
      volumes:
        - name: jenkins-data
          persistentVolumeClaim:
            claimName: jenkins-data
In addition, we mounted to the pod using:
          volumeMounts:
            - mountPath: /var/jenkins_home
              name: jenkins-data
As you can see, in order to use volumes we added volumes to Jenkins deployment in pod template spec. In addition, we specified which volumes to mount to pod containers using VolumeMounts.
To make sure you always get it right refer to Kubernetes API reference.
It also provides the most succinct line about volumes I ever saw:
Volumes provide filesystem external to the Container. Maybe shared across Containers within the same Pod and have a lifetime persisting beyond a Container or Pod.
- Finally, stop port forwarding and our cluster.
$ minikube stop --profile customSummary
That’s it about Kubernetes volumes. Please, note that as professional Kubernetes admin, you’d probably not create Kubernetes volumes manually. You’d rather use Kubernetes storage dynamic provisioning.
- Become a Certified Kubernetes Administrator (CKA)!
- Become a Certified Kubernetes Application Developer (CKAD)!
- BUNDLE KUBERNETES FUNDAMENTALS & CKA CERTIFICATION (COURSE & CERTIFICATION) FOR THE BEST DEAL! $499 ONLY!
Recommended Kubernetes courses on Pluralsight:
Sign up using this link to get exclusive discounts like 50% off your first month or 15% off an annual subscription)
Recommended Kubernetes books on Amazon: