Categories
Best Practices

Add Redis Cache to WordPress

Using Redis cache may significantly speed up your web apps. Today we’ll see how to add Redis cache to WordPress. To achieve that I’ll deploy Redis, install PHP Redis client extension and install Redis Object Cache WordPress plugin.

If you later find this article useful take a look at the disclaimer for information on how to thank me.

Why do you need Redis for WordPress

After upgrade to WordPress 6.1 you may get a warning in Site Health tool: “You should use a persistent object cache”. Why do you need it?

Using Persistent Object Cache will speed up page load times by saving on trips to the database from your web server.

WordPress optimization docs

Remember that database queries are one of the most expensive ones. Some queries are performed for each page view. So why to not cache them in RAM? That’s where Redis comes to the rescue. It keeps most frequently used db queries results in RAM. Yet, what will read those queries’ results from Redis and from db if they are not available? Right, we need some backend between the webserver (e.g. Apache) and Redis along with the database. That’s where Redis Object Cache plugin comes into play and provides that backend.

Deploy Redis

You can install and deploy Redis in multiple ways. For example, install and run it as an OS package or using docker and Kubernetes. I’ll deploy containerized Redis, because it’s rather easy and doesn’t conflict with existing OS packages. The only OS packages you need are either docker or podman and their dependencies. I’ll use podman which is a deamonless alternative to docker. podman CLI is the same as docker’s, so you can use the same docker commands. Just replace the word docker with podman:

podman run --name redis -p 6379:6379 -d docker.io/redis

This method assumes you run WordPress not in a container, but rather as apache web app directly on your VPS (e.g. on Linode). For instance, if you deployed WordPress as a marketplace app. If you run WordPress in a container refer to the below way for deploying Redis.

To check your Redis is running and healthy enter its container and ping it:

podman exec -it redis bash
# redis-cli
127.0.0.1:6379> ping
PONG

If you rather prefer using a managed Redis solution, consider using Linode’s Redis marketplace app. Linode is a cloud provider recently purchased by Akamai. With this purchase, Akamai became a competitor in the cloud providers market.

Install Redis client php extension

Installing Redis client php extension might be optional. You may skip it and do that only if you discover that Redis Object Cache plugin is not working.

If you still need to install the client you can install
phpredis
or other supported extensions like predis.

Install Redis Object Cache plugin

You need Redis Object Cache plugin because it checks first whether the required data from WordPress DB is present in Redis cache. If it does, it reads it from Redis, otherwise queries the database. The plugin is basically a persistent object cache backend for WordPress. I’ll use composer and wp-cli for installation of the plugin and inspecting its status.

Configure WordPress to use Redis

If you use Bedrock WordPress setup, add to your application.php 2 below commands:

Config::define( 'WP_REDIS_HOST', '127.0.0.1');
Config::define( 'WP_REDIS_PORT', 6379 );

Add Redis cache to WordPress in Docker

If your WordPress setup is containerized e.g. in docker-compose stack, you can add Redis in as an additional service:

  redis:
    image: redis
    container_name: '${COMPOSE_PROJECT_NAME}-redis'
    restart: 'always'
    expose:
      - 6379

and raise it using docker-compose up -d redis.

In that case Config::define( 'WP_REDIS_HOST', '127.0.0.1'); will have to change to Config::define( 'WP_REDIS_HOST', '${COMPOSE_PROJECT_NAME}-redis');. In addition you’ll have to add COMPOSE_PROJECT_NAME variable to .env file. Of course, the above steps assume you use the Bedrock WordPress setup.

Summary

That’s it about adding Redis cache to WordPress. Feel free to share this article.

If you found this article useful, take a look at the disclaimer for information on how to thank me.

You may find interesting below articles I wrote:

Find out recommended Redis books on Amazon.

Categories
Best Practices networking Orchestration

Kubernetes Ingress Demo

You have probably heard of Kubernetes ingress. What purpose does it serve? How to use it? Keep reading to find out.

Categories
Web Development

Create a Tech Blog – Domain Name and Hosting

If you want to create and manage your own tech blog you have to choose a domain name and select a hosting provider. You can find an introduction to domain names and hosting providers below. You’ll also learn where to buy a domain and host your blog. One may find this information useful for any type of website.

Domain Name

Domain name introduction

In short, domain is your website name e.g. rokpoto.com. You buy it from domain name registrars. Apart from the name itself you may probably buy complementary services like whois guard, premium DNS services, SSL certificates etc…

Where to buy a domain

Below you can find a list of recommended domain name registrars where you can buy a domain and complementary services. I had experience with some of them, made comparisons and selected them after thorough research.

SiteGround Web Hosting Platform
Namecheap Hassle-free way to register your domain
MochaHost Get 1 LifeTime Free Domain Name
iDotz.Net Domain Name Registration
GlowHost Web hosting for small business and individuals
Domain name registrars

Hosting

Hosting introduction

Hosting providers provide you with many vital services. In short, hosting provider stores your website files like css, html. In addition it may store your database if your site uses one. It provides your website an IP address which your point domain name to. This is usually done by pointing your domain name to name servers of a hosting provider.

Hosting providers offer many types of hosting e.g. WordPress, shared hosting, VPS or dedicated server. You will probably start with a shared hosting account. You can purchase a more expensive, yet better option later.

I’ll cover hosting in more detail later. In the meantime, let’s point to 2 main factors I considered the most important while choosing where to host a website: support and money-back guarantee.

By support I mean quality of support, how easy and fast you can get it. Whereas by money-back guarantee, I mean guarantee by the hosting provider to return you money for any reason within some time after the purchase e.g. 30 days. I find this guarantee very important because you usually purchase one year of hosting services upfront.

Where to host a website

bluehost Web hosting done right.
SiteGround Web Hosting Platform
Cloudways Managed Cloud Hosting Platform
WP Engine #1 platform for WordPress
Namecheap Hassle-free way to register your domain
MochaHost Ultra-Fast & Secure Cloud Web Hosting
Hosting providers

Recommended hosting and domain registrar – SiteGround

I personally recommend SiteGround which offers outstanding phone and chat support. In addition, SiteGround offers 30 days money back guarantee with no questions asked.

To summarize the required steps to open a tech blog or any website refer to below steps with screenshots on how you would do it on SiteGround.

Step 1: Choose a Hosting Plan

Choose a Hosting Plan on SiteGround
  • The StartUp plan is perfect for people with one website that are starting now.
  • The GrowBig plan is a great value for money offer, including the option for multiple websites and the Ultrafast PHP that greatly improves website speed.
  • The GoGeek plan is perfect for people with e-commerce and larger sites, or more geeky development needs like more server resources and GIT integration.

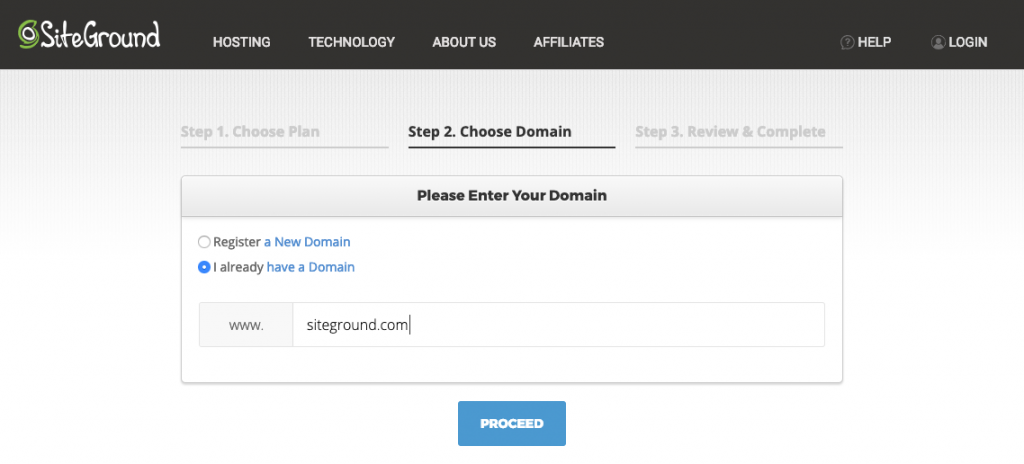
Step 2: Choose a Domain Name

You can choose to buy a new domain, or sign up with an existing domain. SiteGround offers a wide range of domain extensions at awesome prices.

Choose a Domain Name on SiteGround

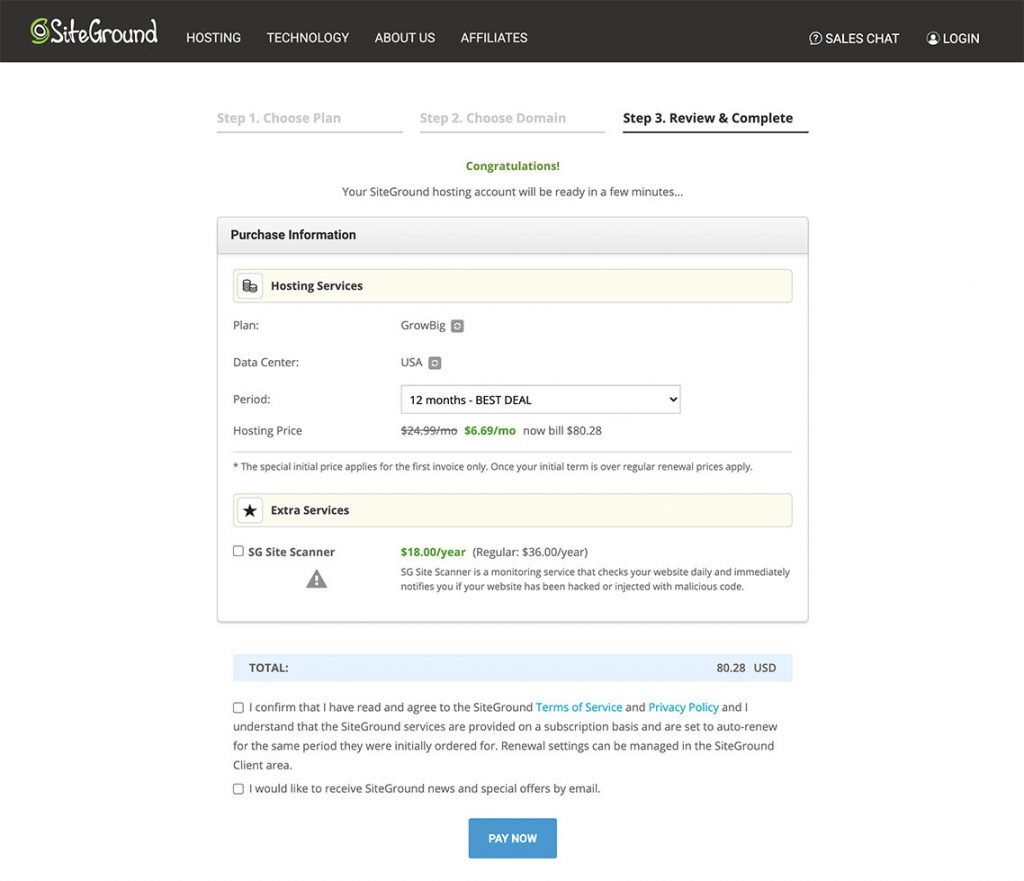
Step 3: Review and Complete the Order

Unlike many other hosting providers, SiteGround offers discount on any of the initial periods chosen during the sign up process.

Review and Complete the Order on SiteGround

Managed Hosting Providers

And of course it’s worth mentioning services like weebly.com where you can purchase a domain, host a website and build it using a user-friendly website builder without code.

That’s it for now, I’ll cover more relevant topics to creation of a tech blog in future posts. Stay tuned)

As always, feel free to share and comment. You may also learn how to create wordpress site using docker fast from my previous post.

Categories
Automation Best Practices UI Testing Web Development

Selenium tests in Docker container. Chrome Browser in Docker too.

So you built a website. You even run it in Docker container. That’s perfect, but how do you test it? Do you have Selenium tests running in Docker container? Nice. Does the browser Selenium tests drive run in Docker container too? If you feel it’s too much, don’t worry. We’ll see an example with all of that covered 🙂 Keep reading to find out more.

Categories
Best Practices Web Development

Point host name to WordPress in Docker

Is it possible to point host name to WordPress website running in Docker container? Sure. Keep reading to find out how.

Categories
Best Practices Monitoring Web Development

Adding Google analytics to WordPress website

So you created your wonderful WordPress website and would like to track its usage 🙂 Of course, adding Google analytics seems like an obvious option. Firstly, you created Google Analytics account. What’s next? Obviously, you can install additional WordPress plugins to enable it on your website. However, more plugins may slow your website down. You may wonder how to add Google Analytics support to WordPress website without a plugin. In addition, adding Google analytics to any website requires some effort to make it GDPR-compliant. What exact steps you should take to achieve that? Are there any privacy-friendly and lightweight Google Analytics alternatives which are fully GDPR-compliant? Keep reading to find out answers to all these questions 🙂

Categories
DevOps Web Development

Create WordPress site using Docker fast

Anyone can create a fully functional WordPress website fast. Thanks to Docker, there’s no need to install LAMP stack on your computer. To demonstrate how easy it is to raise LAMP stack using Docker, we will create new WordPress website. In fact, rokpoto.com itself was created using Docker. In addition, Docker simplifies local development and testing. Keep reading to find out how 🙂